Difference between revisions of "Employees"
(Created page with "The employee list displays down the left side of the employees screen when the software begins. Select the Home tab to return to the Employees view, if you have displayed the ...") |
(→Employees Group) |
||
| (27 intermediate revisions by 2 users not shown) | |||
| Line 1: | Line 1: | ||
| − | |||
| − | [[ | + | The employees list displays down the left side of the screen. Select the Home tab to return to this employees based view, if you have displayed the Scheduler or one of the Configuration screens. The top row of the employees list is a filter row. Type in part of an [[Employee|employee's]] name or their employee ID and press Enter to filter the list to employees that contain any part of the entered text. |
| − | + | Customize the employees list to display the employees with grouping and in the desired order in [[User Preferences]]. | |
| − | + | You can [[Employees Highlighter|highlight]] employees based on the employee have hours, exceptions or placeholders. | |
| − | + | [[image:EmployeesGrid.png]] | |
==Employees Group== | ==Employees Group== | ||
| − | + | [[image:EmployeesGroup.png]] | |
| − | + | The employees group is the first group in the Home tab. You access the following employee-based commands from this group. | |
| − | * ''Add Employee'' – add a new employee. | + | * ''Add Employee'' – add a new employee. |
* ''Find Employee'' – search for an employee based on various criteria including clock ID and Social Security Number. | * ''Find Employee'' – search for an employee based on various criteria including clock ID and Social Security Number. | ||
| − | * ''Highlight'' – highlight employees based on exceptions and placeholders. | + | * ''[[Employees Highlighter|Highlight / Filter]]'' – highlight employees based on exceptions and placeholders. |
* ''Collapse'' – collapse the employee list to display only the group headers while keeping the currently selected employee visible. | * ''Collapse'' – collapse the employee list to display only the group headers while keeping the currently selected employee visible. | ||
| − | * ''Expand'' – expand all groups to display all employees. | + | * ''Expand'' – expand all groups so as to display all employees. |
* ''Refresh'' – retrieve an up to date list of the employees if other users have added employees. | * ''Refresh'' – retrieve an up to date list of the employees if other users have added employees. | ||
| − | * ''Display Older Data'' – toggles the date based filtering of older time card and schedule information. | + | * ''[[Display Older Data]]'' – toggles the date based filtering of older time card and schedule information. |
* ''[[User Preferences]]'' – change the way that employees are grouped or filtered, plus other display options. | * ''[[User Preferences]]'' – change the way that employees are grouped or filtered, plus other display options. | ||
| Line 33: | Line 32: | ||
==Add Employee== | ==Add Employee== | ||
| − | + | [[image:AddEmployeeForm.png]] | |
| − | [ | + | [https://youtu.be/QwsFHaT2OMc Add Employee Video] |
| − | ''Employee ID'' – this must be unique and is validated to ensure that another employee | + | Click on Add Employee to open the Add Employee screen. |
| + | |||
| + | ''Employee ID'' – this must be unique and is validated to ensure that another employee is not already using this ID. | ||
''Next Available ID'' – provides the next higher numbered ID, or use the drop down button to enter an ID as a starting point. | ''Next Available ID'' – provides the next higher numbered ID, or use the drop down button to enter an ID as a starting point. | ||
| Line 49: | Line 50: | ||
''SSN'' – enter it here if you want to validate the uniqueness of an employee by their SSN. | ''SSN'' – enter it here if you want to validate the uniqueness of an employee by their SSN. | ||
| − | ''Labor Levels'' – the employee’s home labor levels. Entered in the Main tab if not entered on this screen. If your authorization only allows you to add employees into certain labor levels, then you will need to enter the labor levels in order to enable the Add button. Click on the [[image:LaborLevelsButton. | + | ''Labor Levels'' – the employee’s home labor levels. Entered in the Main tab if not entered on this screen. If your authorization only allows you to add employees into certain labor levels, then you will need to enter the labor levels in order to enable the Add button. Click on the [[image:LaborLevelsButton.png]] button for the labor levels selection screen. |
''Copy settings from currently selected employee'' – this will copy the labor levels, pay rule, base schedule, holiday group, accrual group and work pattern information settings from the currently selected employee, and assign the next available ID. Please note that no personal information will copy to the new employee. | ''Copy settings from currently selected employee'' – this will copy the labor levels, pay rule, base schedule, holiday group, accrual group and work pattern information settings from the currently selected employee, and assign the next available ID. Please note that no personal information will copy to the new employee. | ||
| Line 65: | Line 66: | ||
'''Add Button''' | '''Add Button''' | ||
| − | The Add button enables once you have entered | + | The Add button enables once you have entered the required employee information. The Employee ID and Clock ID are validated to ensure that they are both unique. The employee will not be added if another employee already uses this Employee ID. The employee will be added, but the clock ID will not be added if the clock ID is already used by another employee. In this situation, a popup message displays. |
After adding the employee, the Add Employee screen will close and the employee is added to the employee list, and is automatically selected. Enter any additional employee information that you are maintaining. | After adding the employee, the Add Employee screen will close and the employee is added to the employee list, and is automatically selected. Enter any additional employee information that you are maintaining. | ||
==Find Employee== | ==Find Employee== | ||
| + | |||
| + | [[image:FindEmployeeForm.png]] | ||
The Find Employee screen searches for employees in various ways and with various criteria. | The Find Employee screen searches for employees in various ways and with various criteria. | ||
| Line 86: | Line 89: | ||
Based on the Find value and the Look In type selected, highlight all employees that match the criteria. | Based on the Find value and the Look In type selected, highlight all employees that match the criteria. | ||
| − | |||
| − | |||
'''Options''' | '''Options''' | ||
| Line 96: | Line 97: | ||
''Default On Enter Key'' – pressing the Enter key can be set to be the equivalent of clicking the Filtered List button or clicking the Find First button. | ''Default On Enter Key'' – pressing the Enter key can be set to be the equivalent of clicking the Filtered List button or clicking the Find First button. | ||
| + | |||
| + | <noinclude>== See also == | ||
| + | |||
| + | * [[Software|Using the Time and Attendance software]] | ||
| + | |||
| + | * [[Employee]] | ||
| + | |||
| + | * [[Reports]] | ||
| + | |||
| + | * [[Scheduler]] | ||
| + | |||
| + | * [[Tools]] | ||
| + | |||
| + | * [[Import]] | ||
| + | |||
| + | * [[Configuration]]</noinclude> | ||
Latest revision as of 19:28, 29 June 2022
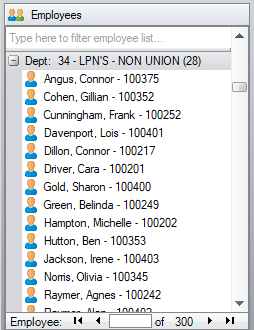
The employees list displays down the left side of the screen. Select the Home tab to return to this employees based view, if you have displayed the Scheduler or one of the Configuration screens. The top row of the employees list is a filter row. Type in part of an employee's name or their employee ID and press Enter to filter the list to employees that contain any part of the entered text.
Customize the employees list to display the employees with grouping and in the desired order in User Preferences.
You can highlight employees based on the employee have hours, exceptions or placeholders.
Employees Group
The employees group is the first group in the Home tab. You access the following employee-based commands from this group.
- Add Employee – add a new employee.
- Find Employee – search for an employee based on various criteria including clock ID and Social Security Number.
- Highlight / Filter – highlight employees based on exceptions and placeholders.
- Collapse – collapse the employee list to display only the group headers while keeping the currently selected employee visible.
- Expand – expand all groups so as to display all employees.
- Refresh – retrieve an up to date list of the employees if other users have added employees.
- Display Older Data – toggles the date based filtering of older time card and schedule information.
- User Preferences – change the way that employees are grouped or filtered, plus other display options.
Add Employee
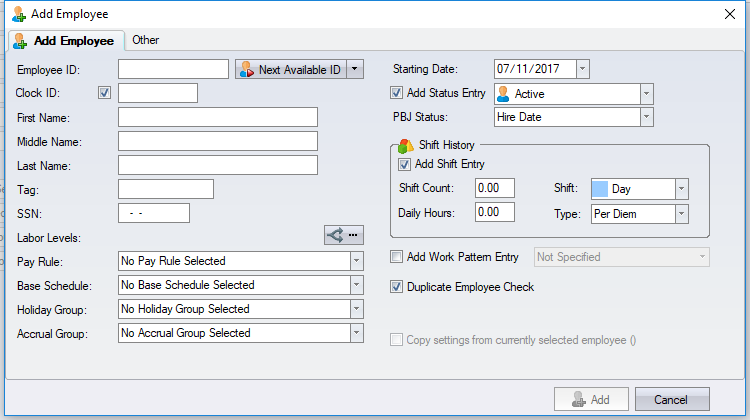
Click on Add Employee to open the Add Employee screen.
Employee ID – this must be unique and is validated to ensure that another employee is not already using this ID.
Next Available ID – provides the next higher numbered ID, or use the drop down button to enter an ID as a starting point.
Clock ID – the ID used at the time clock. If the employee is non-punching, then uncheck the checkbox. The clock ID must be unique and is validated, so if the software finds a duplicate clock ID, it will add the employee, but will not add the clock ID. A popup message will inform you of this.
First Name – enter the employee's first name here.
Last Name – enter the employee's last name here.
SSN – enter it here if you want to validate the uniqueness of an employee by their SSN.
Labor Levels – the employee’s home labor levels. Entered in the Main tab if not entered on this screen. If your authorization only allows you to add employees into certain labor levels, then you will need to enter the labor levels in order to enable the Add button. Click on the ![]() button for the labor levels selection screen.
button for the labor levels selection screen.
Copy settings from currently selected employee – this will copy the labor levels, pay rule, base schedule, holiday group, accrual group and work pattern information settings from the currently selected employee, and assign the next available ID. Please note that no personal information will copy to the new employee.
Duplicate Employee Check – performs a check by name and SSN to identify possible duplicate entry of an existing employee. If the software finds a matching employee, but it is not a duplicate (for example, two employees have identical names), then you will need to uncheck this before clicking the Add button.
Starting Date – used as the date for the status, shift history and work pattern information.
Add Active Status Entry – adds an Active entry into the employee's status information using the Starting Date.
Add Shift Entry – adds an entry into the employee's shift history using the Shift Count, Daily Hours, Shift and Starting Date information.
Add Work Pattern Entry – adds an entry into the employee's Work Pattern information using the Starting Date. If an employee is part of the Scheduler, then select "Soft Scheduler" or "Scheduler".
Add Button
The Add button enables once you have entered the required employee information. The Employee ID and Clock ID are validated to ensure that they are both unique. The employee will not be added if another employee already uses this Employee ID. The employee will be added, but the clock ID will not be added if the clock ID is already used by another employee. In this situation, a popup message displays.
After adding the employee, the Add Employee screen will close and the employee is added to the employee list, and is automatically selected. Enter any additional employee information that you are maintaining.
Find Employee
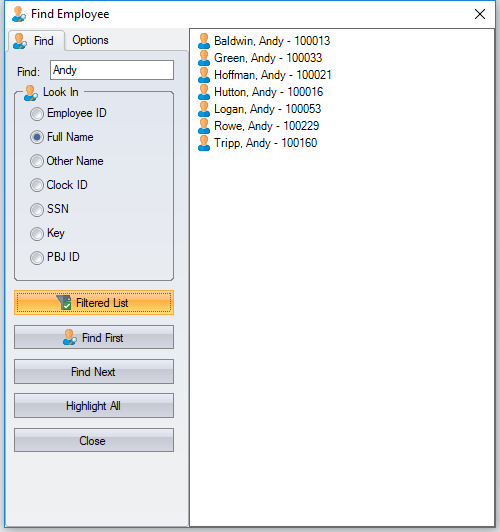
The Find Employee screen searches for employees in various ways and with various criteria.
Find
Filtered List
Based on the Find value and the Look In type selected, a filtered list of employees displays. Clicking on an employee selects that employee in the employee list.
Find First / Find Next
Based on the Find value and the Look In type selected, you can move sequentially through the employee list until no more employees match the criteria.
Highlight All/ Unhighlight
Based on the Find value and the Look In type selected, highlight all employees that match the criteria.
Options
Employee Status Filtering – only employees in a status that is set to display by default will be included in searching unless you select other status types. If the found employee is not currently displayed in the employee list, then you will need to make them visible first.
Sort Order – sorts the list of employees by the employee ID, the employee name, or the best matching value. The best matching value sorts those employees that start with the value you are looking for, before employees that contain or end with the value you are looking for. For example, when looking for "berg," Bergman would come before Goldberg.
Default On Enter Key – pressing the Enter key can be set to be the equivalent of clicking the Filtered List button or clicking the Find First button.


