Scheduling Training
There are 3 steps to the scheduling process. Whatever type of scheduling period you use, whether it’s monthly, four weeks, or eight weeks, the steps that you are about to learn is the same for EACH scheduling period and you should do these steps in this order before building the schedules for every scheduling period moving forward.
Contents
STEP 1
Schedule Patterns
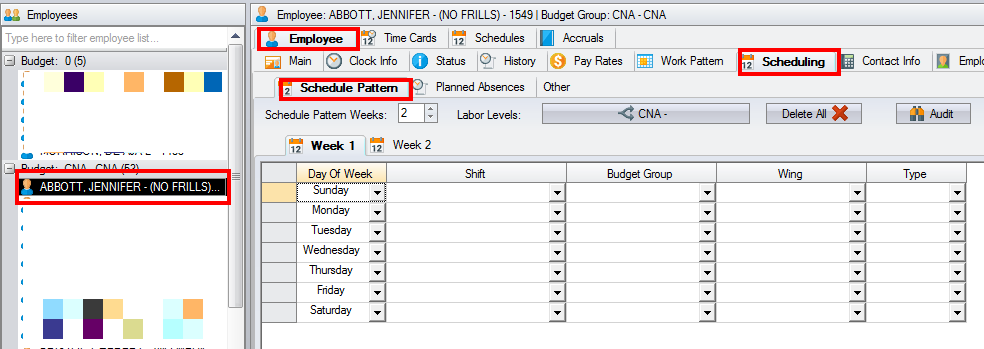
This is the step where you input schedule patterns and planned absences. You can home people on a floor, and give the employees their schedule pattern by clicking on an employee and going to their employee -> Scheduling -> Schedule Pattern tab.
- Schedule patterns (Master Schedule) is where you can input any recurring pattern that your staff works.
- For Example, if you do 4 week scheduling and someone works the same schedule in weeks 1 and 3, and the same schedule in weeks 2 and week 4, then all you need to do is give the employee 2 schedule pattern weeks.
- If you have a 4 week scheduling period and someone works the exact same schedule every single week of the 4 week scheduling period, then all you need to do is give them a 1 week pattern.
- If you have a 4 week scheduling period and someone works a different schedule every single week of a 4 week scheduling period then they will need to have a 4 week schedule pattern.
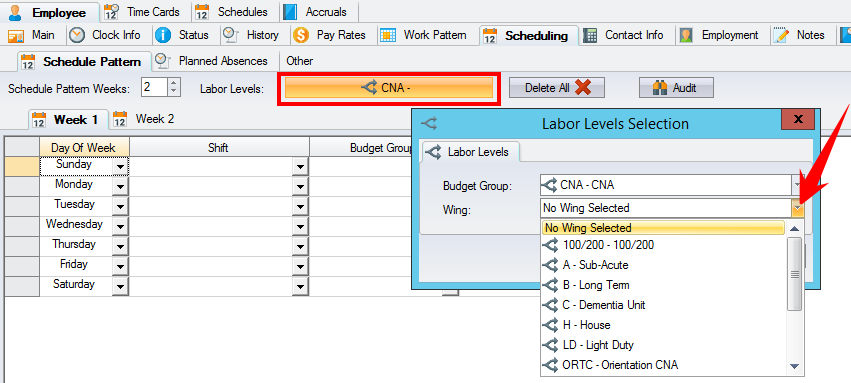
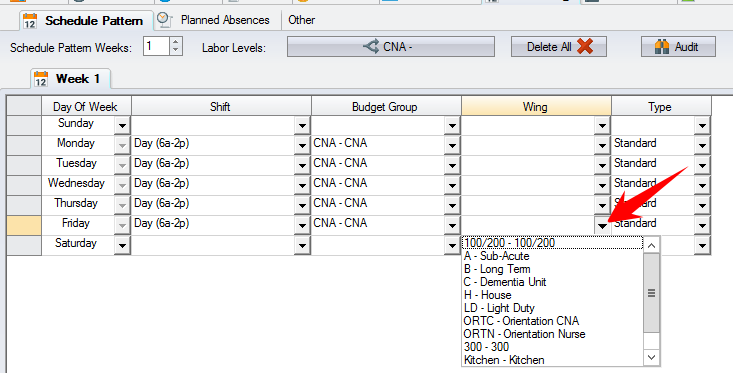
- Part of giving a schedule pattern to someone is to choose the floor for that schedule. If you know that the employee will be working the SAME floor for EVERY schedule, then you can Home them on that floor by selecting the homing button and choosing the floor from the labor levels dialog box that pops up.(See Picture A) Alternatively, you can choose each floor manually, but this will take longer. (See Picture B)
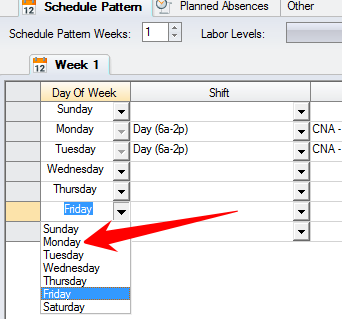
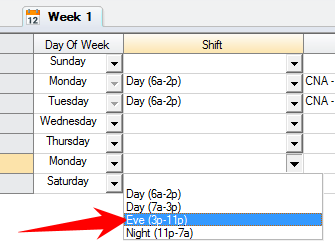
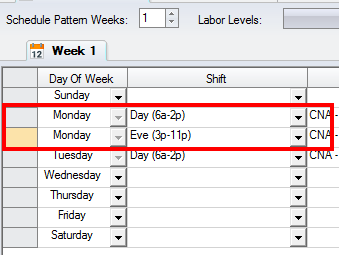
- If you have someone who is scheduled to work a double shift, you can enter this in the schedule patterns. First assign the regular shift as you normally would. Then, on any other day in the same week that does not have a schedule, choose the day and change it to the day you want the employee to have a double.(See Picture A) Once the day is changed, give them the second half of the double and you will see that there will be two options of the same day.(See Picture B) One with the first half of the double shift and one with the second half. (See Picture C)
- If you would like to clear out all the schedule patterns for a specific employee and start from scratch you can use the Delete All button. This will clear out all schedule patterns for the employee that you choose.
Planned Absences
Once you are done putting in all the schedule patterns for all the regularly scheduled staff, you then move onto planned absences. Planned absences is where you can put someone on vacation, FMLA, etc., BEFORE you build your schedules. That way, when you do build your schedules, the software will automatically take the employee off on the days that they have set schedules and make those schedules available for someone else to take.
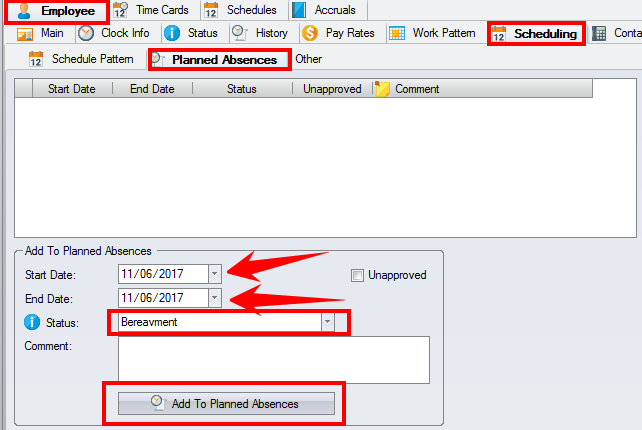
- You do this by going to the Employee -> Scheduling -> Planned Absences tab and choosing the first day that they are AWAY and the last day that they are AWAY, choose a reason why from the Status drop down list and click add to planned absences. If you need to add more placeholders to the list you can do this by contacting SBV support.
- Please note – if you add planned absences after the Schedule Period is built, it won’t be reflected in the scheduler. If an employee informs you of an absence after the build, you can;
- Unschedule the employee from the applicable shifts in the scheduler
- Use the regenerate function
STEP 2
The goal of this step is to have both of the following reports empty before moving onto step three. Once you are done inputting all the schedule patterns and planned absences, you are ready to move onto the next step which is running two reports. Both reports should be ran for the NEXT (specific) scheduler period.
Schedule Patterns without Budget
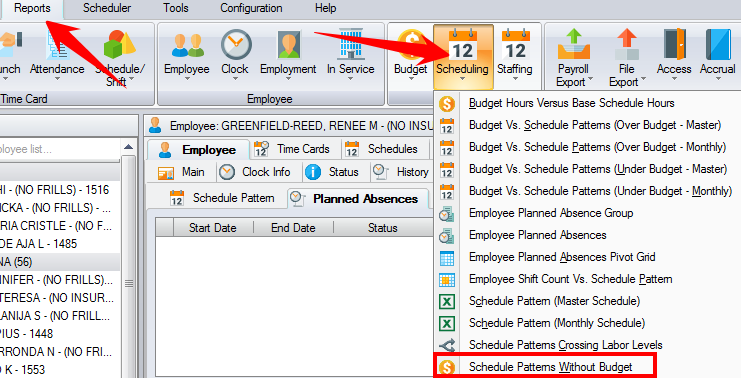
- The first report that you need to run is called "Schedule Patterns without Budget." This can be found by going to Reports -> Scheduling -> Schedule Patterns without Budget. If there are any entries when running this report it means that you gave someone a schedule pattern that you don’t have a budget for. For example, generally, C.N.A.’s work on specific floors while unit managers or supervisors work the house or all floors. So when the client puts a C.N.A. on the house floor and that isn’t part of the budget, it will show up on this report. Another reason for entries on this report is if information is missing. Make sure all schedules that were given to employees have floors/units. If there are any changes that need to be made to the budget please contact SBV support.
- The next report is the Budget vs. Schedule Patterns (Over Budget Monthly) report. This can be found by going to Reports -> Scheduling -> Budget vs. Schedule Patterns (Over Budget Monthly).
If there are any entries on this report it will mean that on that specific day, shift, budget group, and floor you have scheduled too many people. There are three common scenarios that would cause these entries on the report.
- The first possibility is that there is a specific employee with a schedule that doesn’t work at your facility anymore. To fix this, go to the employees’ schedule pattern tab and delete all the schedules that they have.
- Another possibility is that they do still work at the facility, but they are given a schedule that you have too many people working that schedule. To fix this, move the employee to a schedule that you are currently under budget for. To see where you are under budget, go to Reports -> Scheduling -> Budget vs. Schedule Patterns (Under Budget Monthly). Make sure to run it for the identical dates that the Over Budget Monthly report is being run for. The Under Budget Monthly report will give you the available schedules and the amounts of positions open to be given to employees.
- The last reason entries would be on this report is because the budget is incorrect. If that is the case, please contact SBV support. Bear in mind, the budget is set and confirmed before we start the scheduling process so in most cases this is not the reason for entries on the report.
STEP 3
Once both reports come back clean, you are then ready to build your schedules. Follow the steps below to build your schedules.
- You do this by going to Scheduler -> Build Schedules
- A small window will pop up when you click “build schedules”
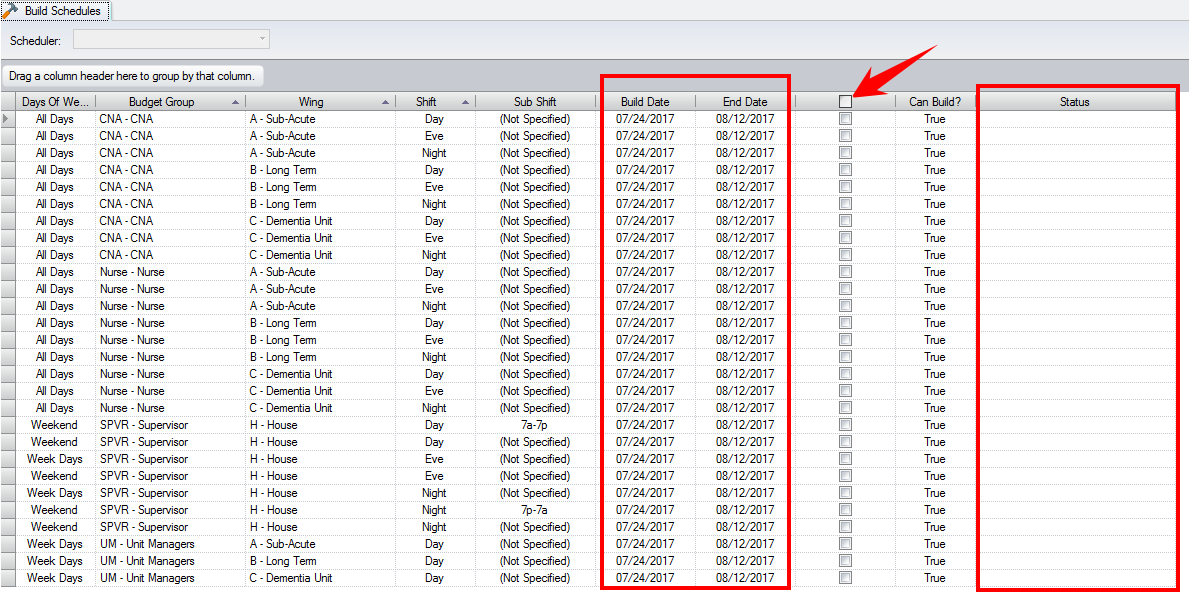
- Maximize that window and you will see all of your budget groups that you are going to be building.
- Make sure you double check that the build date and end date columns reflect the scheduling period that you want to build for.
- Confirm that it’s correct, then click on the HIGHEST MOST check box (see picture) which will then select all the budgets below.
- With the budgets checked off, you can select build schedules.
- Once you select this button you will no longer be able to move out of that window. In the status tab for all the budget groups, you will see it go through a series of steps. This is the software building the schedules.
- Once it is done, the close button will then become available on the bottom, and the build date would move forward to the next build.
Make sure NOT to select the Build Schedules button again because this will cause the software to build an additional scheduler period which isn’t recommended. If you do, the only way to delete out a scheduling period that was built by accident is to contact SBV Support.
