Time Clocks Configuration
| This topic is for advanced users |
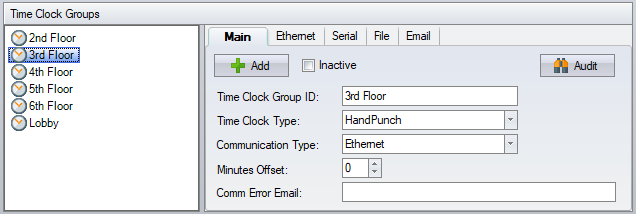
Enter the time clocks in Time Clocks configuration. The time clocks are organized under a time clock group that represents the method of communication, with the time clock representing the physical time clock.
Contents
Time Clock Group
Main
Time Clock Group ID – a way to identify the physical location or connection used to communicate with single or multiple time clocks.
Time Clock Type – currently we only support the HandPunch time clock (HPX000 series). The software can also import the information from the PNETG format that is generated by the Recognition Systems PNETG software. This format is also used by the HPunch32 software.
Communication Type -
Minutes Offset - if the time clock is in a different timezone than the software server, input the number of hours (in minutes) between the time zones. As an example, if the server is in NY and the time clock is in CA, input -180. If the server is in CA and time clock is in NY, input 180.
Comm Error Email -
Communication Type
- RS-485 – the software communicates via the serial port using a RS-232 to RS-485 converter.
- RS-232 – the software communicates directly via the serial port.
- Modem – the software uses a modem to dial out to the time clock.
- Ethernet – the software communicates using the TCP/IP protocol to the time clock.
- File – this allows re-processing of the punch log file created by the software.
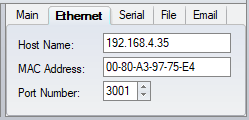
Ethernet
IP Address – the IP address of the time clock. Do not zero fill the IP address, e.g. 192.168.1.100.
MAC Address – the software will use DNS to get the MAC address from the IP address. It is not necessary to set the MAC Address to communicate to the time clock. This is an informational field that may be useful in network diagnostics.
Port Number – the port used by the time clock.
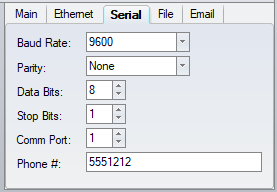
Serial
Baud Rate – this must match the rate that the time clock is configured at. With RS-232 and RS-485, this is generally 9600 or 19200. With a modem connection, it is generally 2400 or 9600.
Parity – Odd, Even or None
Data Bits – 7 or 8
Stop Bits – 0 or 1
Comm Port – the comm port (serial port) that the time clock or modem is using.
Phone # – the number to dial for a modem connection.
File
File Path – the full path to the file.
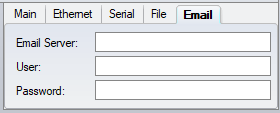
For a local Exchange server use:
Email Server - "https://emailOrOtherName.Facility.com/EWS/exchange.asmx"
User - "DomainName\EmailUsername|EmailUsername@Facility.com"
For office365 use:
Email Server - "https://outlook.office365.com/EWS/Exchange.asmx"
User - "EmailUsername@Facility.com"
Time Clocks
Main
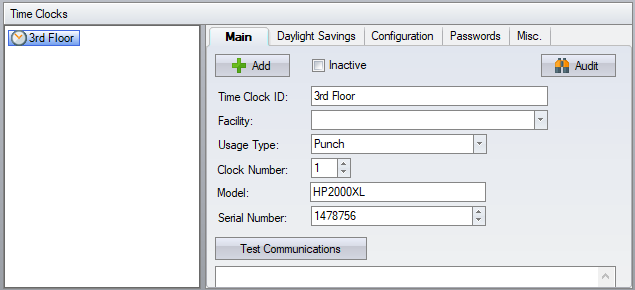
Time Clock ID – an identifier for the time clock. This displays in the Clock Info tab. Users need to be able to identify the Time Clock from this ID.
Usage Type
- Punch – punches made at the clock will apply to the time cards
- Access – punches made at the clock are considered access or entry punches and only go into the access log
- Both – punches are considered both "punches" and "access"
Clock Number – this must match the clock number that the time clock is set to.
Model – the software will get the model when it communicates to the time clock. It is not necessary to set this to communicate to the time clock.
Serial Number – the software will get the serial number when it communicates to the time clock.
Daylight Savings
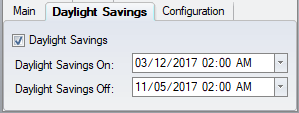
Daylight Savings – check this if you want the time on the clock to change automatically for daylight savings. If you do not want the clock to do it automatically, then you will need to have a user change the time manually or schedule a task to do it.
Daylight Savings On – the date and time at which the clock will move one hour ahead.
Daylight Savings Off – the date and time at which the clock will move one hour back.
Note – the HandPunch only uses the month, date, hour and minute portion of the daylight savings dates.
Configuration
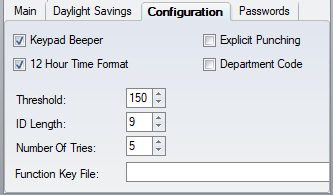
Keypad Beeper – a beep is emitted when the keypad is used on the time clock.
12 Hour Time Format – time does not display AM and PM on a HandPunch, if you want to be assured that the time shown is correct (and not 12 hours off), then do not check this and the time will display in military format.
Explicit Punching – the HandPunch will display the standard explicit punching menu after entering the clock ID (1 – IN 2 – OUT 3 – BACK)
Department Code – the HandPunch will prompt for the department after the clock ID is entered.
Threshold – the default on a “cold-booted” HandPunch is 100. Typical values are from 100 to 150. It is generally raised to compensate for the calibration having changed slightly from the factory calibration.
ID Length – if all employees are using the same length clock ID, then setting this to the length of the IDs will eliminate the need to press Enter after the last digit.
Number of Tries – when the hand validation fails, the HandPunch will prompt the employee to “TRY AGAIN.” This setting determines how many times they will be prompted, before getting rejected.
Exposure – camera information gathered from the HandPunch.
Function Key File – if you are using a custom menu at the HandPunch, then this is where you specify the path and name of the function key file.
Send Function Key File – communicates to the HandPunch and uploads the function key file.
Passwords
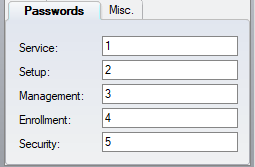
Service – this is the menu that is accessed via the 1 key on a "cold-booted" HandPunch. The main function ever required in this menu is Calibrate, which provides information on the camera alignment.
Setup – this is the menu that is accessed via the 2 key on a "cold-booted" HandPunch. It allows the time to be changed on the HandPunch and although this information is logged, it may not be desirable to allow access to this menu.
Management – this is the menu that is accessed via the 3 key on a "cold-booted" HandPunch. This menu provides supervisor override functions when you have implemented restrictions at the clock based on time or location.
Enrollment – this is the menu that is accessed via the 4 key on a "cold-booted" HandPunch. This is the main enrollment menu.
Security – this is the menu that is accessed via the 5 key on a "cold-booted" HandPunch. This menu provides Special Enrollment for employees who are unable to use the HandPunch in a regular manner, because they do not have all fingers or cannot straighten their fingers sufficiently.
